Teleport Blog - How to Set Up Kubernetes SSO with SAML - Oct 15, 2020
How to Set Up Kubernetes SSO with SAML
Kubernetes has some impressive baked-in role based access controls (RBAC). These controls allow administrators to define nuanced permissions when querying Kubernetes resources, like Pods, Deployments, ReplicaSets, etc. For those familiar with Kubernetes, the value of RBAC is immediately recognizable. A single Kubernetes cluster can contain your organization’s entire CI/CD pipeline, highly available SaaS products, or infrastructure that is in the process of being moved to the cloud. For what’s at stake, weak access controls are a nonstarter.
Authenticating with SAML
Authorization is only half the battle. Even the strictest access policy is obsolete if the authentication can be spoofed. For this reason, Kubernetes supports a range of common authentication patterns, such as static tokens, client certificates, OIDC, and other methods. With all the components available, secure access should be simple: (1) request access to a cluster through SSO, (2) have the K8s API authenticate against your identity provider (IDP), and (3) apply rules based on identity information. Voila.
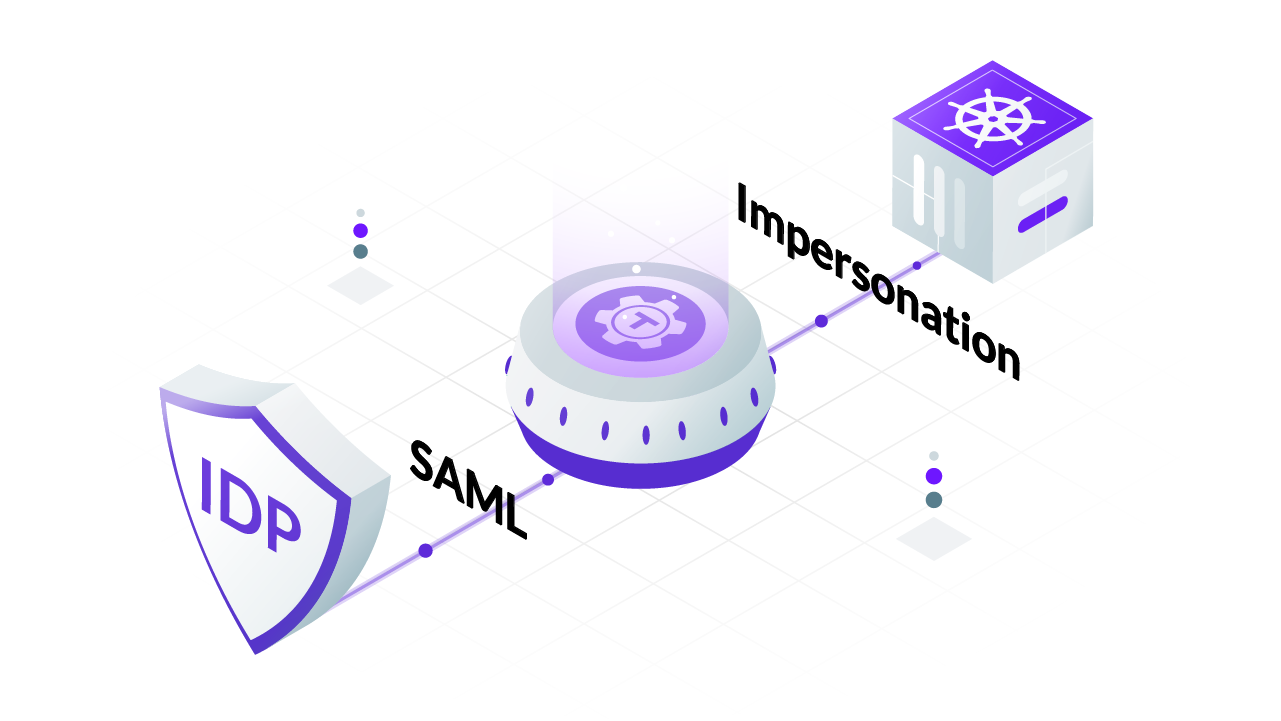
Unfortunately, if your protocol of choice is SAML, which it is for many enterprise organizations, this setup requires extension. We can accomplish this by placing a proxy between the user and Kubernetes API that can read SAML assertions and translate attributes into a format the API is built to read and process. There are three readily documented ways to accomplish this, authenticating proxy, webhooks, or user impersonation. This blog post focuses specifically on user impersonation. Why? Because if you are using a hosted Kubernetes provider, which many are doing due to its complexity, users don’t have control over the kube-apiserver flag required to set up webhooks or an authenticating proxy.
By the end of this article, we will have:
- Understood what User Impersonation is
- Created a SAML connector
- Assigned a proxy impersonation privileges
- Impersonated a user
- Mapped SAML attributes to Kubernetes Groups
What is Single Sign On (SSO)?
Single sign on, or SSO, is an important tool in federating identity across multiple different systems. SSO disposes the need to create a new set of credentials for each application accessed. Instead, the process of authentication is outsourced to identity providers like Okta, GSuite, or Keycloak. This allows organizations to enforce a consistent method of authentication across all internal corporate services.
What is SAML?
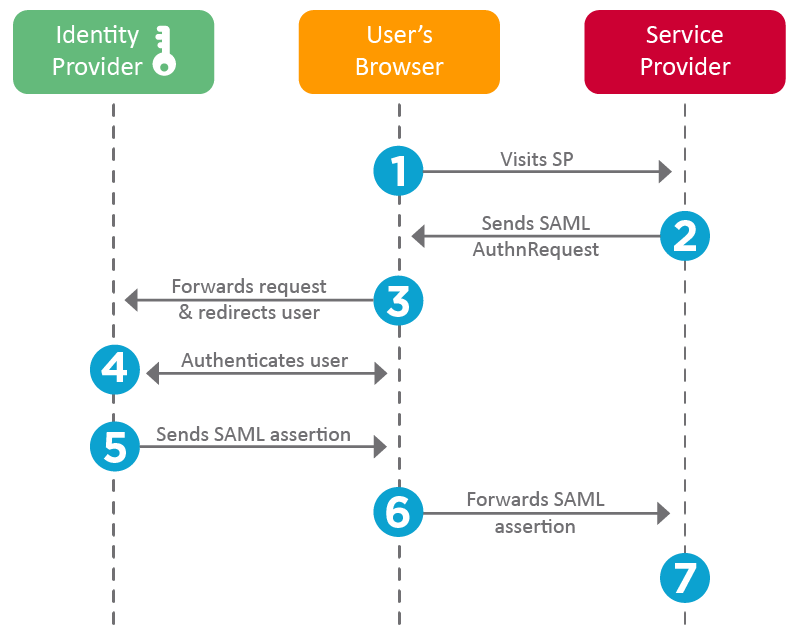
To enable SSO for a particular application, it must support an authentication protocol. One of these protocols is the Security Assertion Markup Language (SAML). These protocols allow identity providers to authenticate users on behalf of the application and pass on authorization information back to the application. If you are not familiar with SAML, I recommend reading through How SAML 2.0 Authentication Works.
What is Kubernetes User Impersonation?
To understand what impersonation is and why it is useful, let’s take a step back and quickly go over Kubernetes RBAC. The RBAC API uses the Role and ClusterRole objects to define a set of permissions. These roles are then bound to accounts that the roles apply to using RoleBindings and ClusterRoleBindings respectively. Take this snippet that would grant read only access to all pods.
# pod-reader-role.yaml
apiVersion: rbac.authorization.k8s.io/v1
kind: Role
metadata:
  namespace: default
  name: pod-reader
rules:
- apiGroups: [""]
  resources: ["pods"]
  verbs: ["get", "watch", "list"]
We can take this pod-reader role and bind it to a particular user, jane.
# pod-reader-jane-binding.yaml
apiVersion: rbac.authorization.k8s.io/v1
kind: RoleBinding
metadata:
  name: read-pods
  namespace: default
subjects:
- kind: User
  name: jane
  apiGroup: rbac.authorization.k8s.io
roleRef:
  kind: Role
  name: pod-reader
  apiGroup: rbac.authorization.k8s.io
After Jane authenticates herself against the core API, the RBAC layer will map Jane to the pod-reader role and set her permissions as such. But because Kubernetes does not support SAML as an authentication protocol, Jane never makes it past the first step. The API would not know what role to assign to Jane or any other account for that matter. Instead, we need a way of extending the authentication methods to include SAML.
The trick is to not let Jane authenticate herself directly with the API, but rather use a ServiceAccount as a proxy identity that will take on Jane’s account attributes. The ServiceAccount still needs to authenticate itself to the API, but because it is not tied to an external IDP, SAML does not enter the equation at all. Instead, the ServiceAccount would directly authenticate with the Kubernetes API and translate traits like name: jane. This method of impersonation bypasses the need for the Kubernetes API to directly authenticate Jane while still allowing the RBAC API to assign the pod-reader role. The actual process of impersonation is accomplished by passing HTTP headers between the impersonating proxy and Kubernetes API like Impersonation-User and Impersonate-Group.
Which Proxy Will We Use?
We could configure a proxy from scratch, creating a ServiceAccount or normal user and giving it impersonation privileges. But this won’t let us map SAML attributes to Kubernetes groups since a vanilla account has no way to translate attributes to groups. Instead, we use an OSS tool called Teleport, which, for reasons later explained, gives us that ability. If this mapping is not important to you, the rest of this article is still relevant, but instead of using the Teleport proxy just create a generic proxy account.
Teleport consists of two services: a Proxy service, which accepts credentials from clients, and an Auth service, which issues and validates those credentials. While Teleport is much more, this simplified description is sufficient.
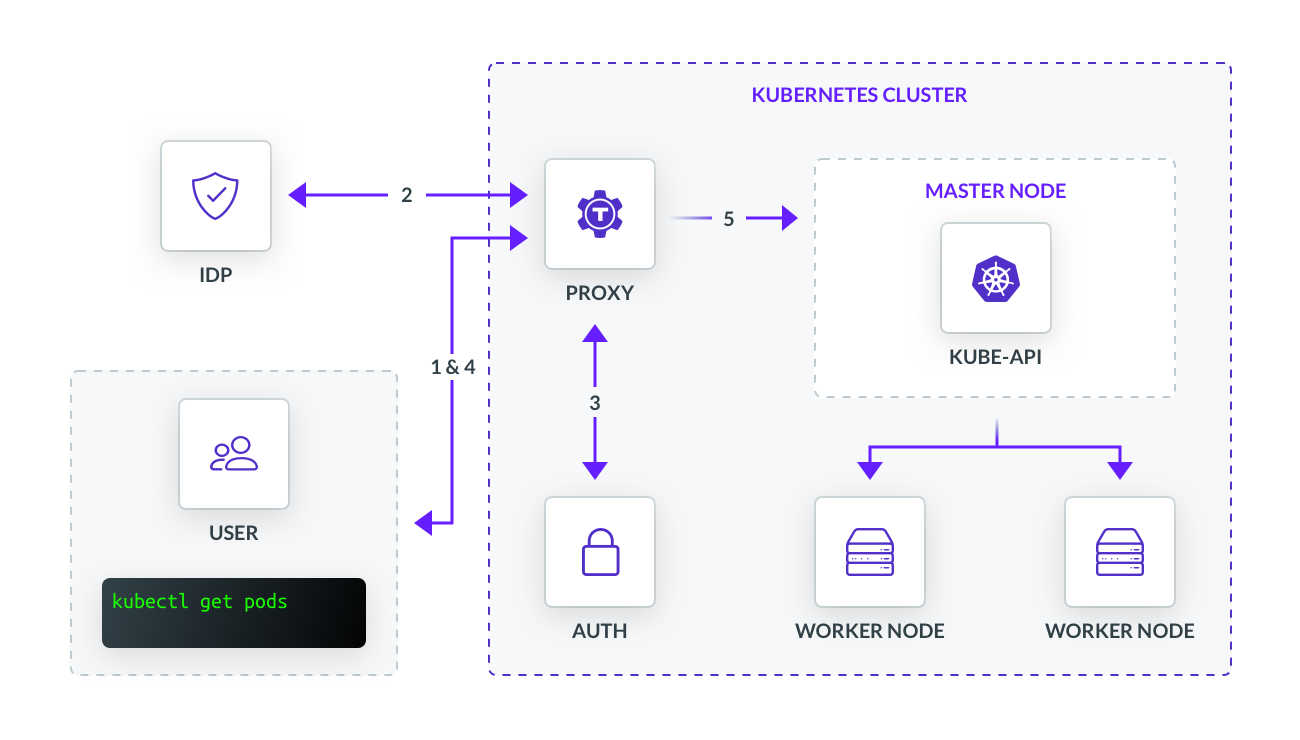
The diagram above shows a generic implementation of how we might use Teleport as a gateway to access a Kubernetes cluster. The flow is as follows:
- User identifies which compute resource they would like to access, such as a Pod
- User is prompted to sign into their IDP using SAML on the backend
- Once verified, the user will receive a certificate generated by the certificate authority hosted on the Auth service
- User will store the certificate locally for later use
- Upon user request, the proxy will authenticate against the Kubernetes API and impersonate the user’s request
SAML Connector
Before we touch impersonation, we must first set up a SAML connector to our proxy. Well really, first we have to set up the services, but let’s make some assumptions for the sake of time:
- Teleport is running with the proxy and auth services deployed as pods
- We’ve registered ourselves as a user with Teleport proxy
Recall impersonation uses an account as a proxy between the API. This means the process for user authentication via SAML is an entirely separate process than the proxy authentication with the Kubernetes API. The user authentication happens with the proxy and auth services, not the API. Using some technical terminology, Teleport is our Service Provider requesting authentication and identity information from our IDP of choice.
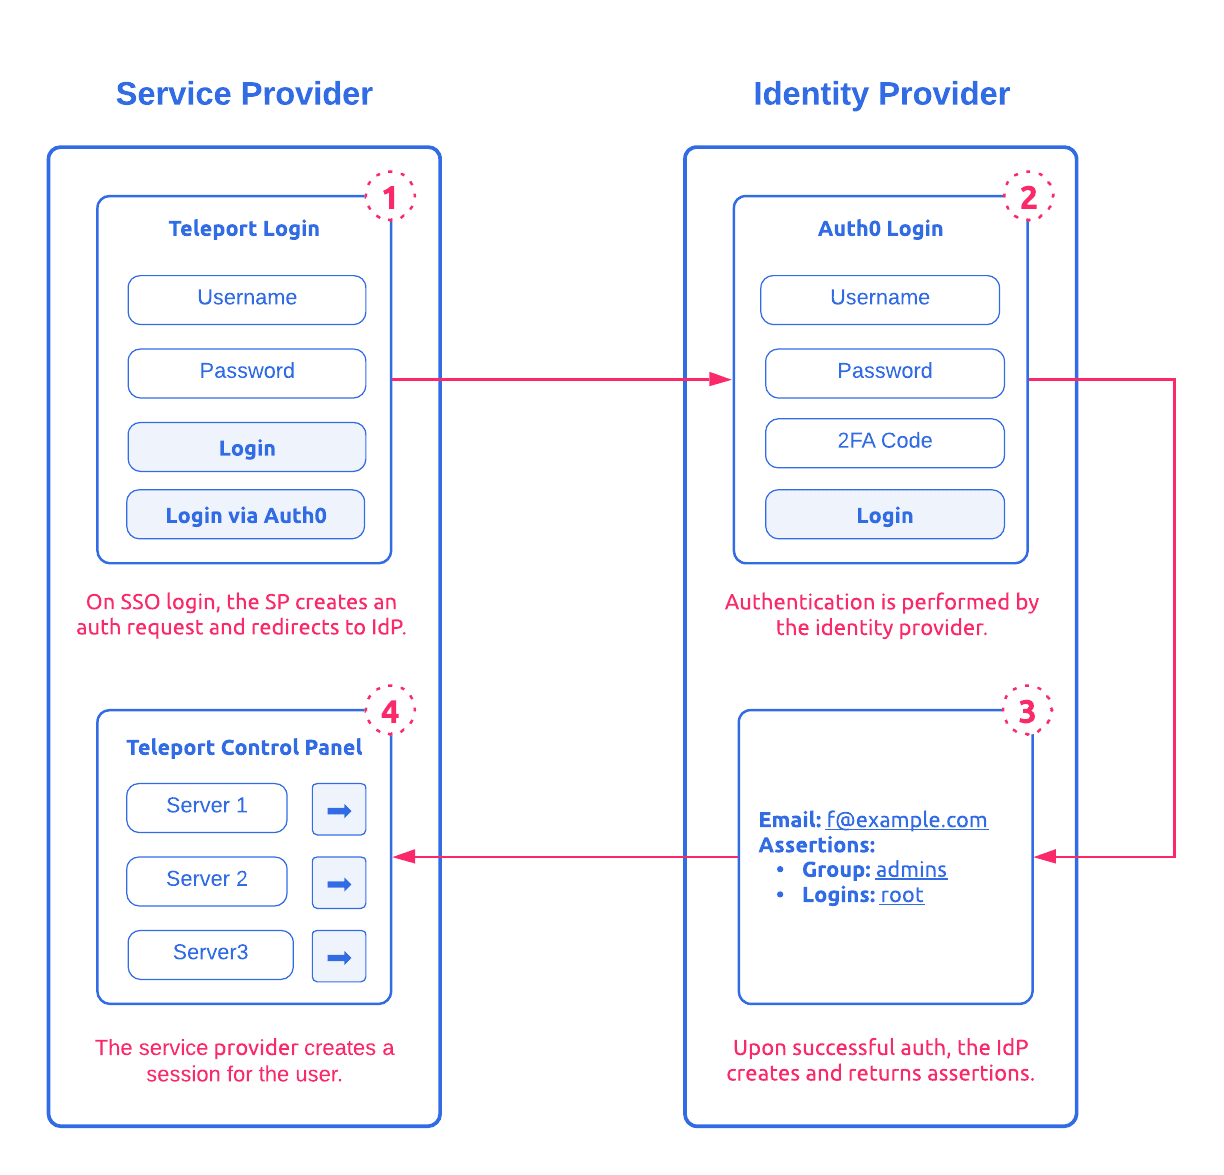
To do so, we must define and create a SAML connector as a YAML file. The following snippet builds off Diagram 2 and would create a resource for Teleport to use that contains the Auth0 SAML endpoint and an ACS URL redirecting back to Teleport.
# saml-connector.yaml
kind: saml
version: v2
metadata:
  name: saml_connector
spec:
  display: "Auth0"
  acs: https://teleport-proxy.acme.com:3080/v1/webapi/saml/acs
  attributes_to_roles:
    - {name: "groups", value: "admins", roles: ["root"]}
For now, let’s ignore attributes_to_roles. I’ll get back to this later. Our integration is looking a bit more like:
Impersonation Privileges
To let Teleport impersonate users, it needs to be authorized to do so. So just as Jane has the pod-reader role above, we have to create a similar object and bind it to the proxy.
apiVersion: rbac.authorization.k8s.io/v1
kind: ClusterRole
metadata:
  name: impersonator
rules:
- apiGroups: [""]
  resources: ["users", "groups", "serviceaccounts"]
  verbs: ["impersonate"]
- apiGroups: ["authorization.k8s.io"]
  resources: ["selfsubjectaccessreviews"]
  verbs: ["create"]
Because the Kubernetes API is written to be RESTful, it uses the HTTP verbs to manipulate Kubernetes resources. But some verbs have special meanings, the authentication layer uses the “impersonate” verb to allow HTTP headers prepended with Impersonate-. The YAML file above lets the ServiceAccount impersonate users, groups, serviceaccounts.
We finish up with the ClusterRoleBinding and point the API to which account the RBAC layer should apply the cluster role to.
apiVersion: rbac.authorization.k8s.io/v1
kind: ClusterRoleBinding
metadata:
  name: teleport-proxy
roleRef:
  apiGroup: rbac.authorization.k8s.io
  kind: ClusterRole
  name: impersonator
subjects:
- kind: ServiceAccount
  # Teleport proxy ServiceAccount name
  name: teleport-serviceaccount
  namespace: default
Having bound the impersonator cluster role to teleport-serviceaccount, the Kubernetes API can verify that Teleport has impersonation privileges upon authentication.
Putting it All Together
In just two steps, we have everything required for a SAML authenticated user to access a Kubernetes resource. Combining everything we’ve configured above, let’s see what happens when Jane executes kubectl get pods in her command line.
Authenticate with SAML
Jane must first authenticate herself to Teleport before she can run her command. Considering this is Jane’s first time accessing the Kubernetes API, she does not have a locally stored credential that would automatically authenticate her. Instead, Teleport pulls from the connector file we created and redirects her via web browser for SSO.
After authentication through username/pass, MFA, Yubikey, etc, Jane will redirect back to https://teleport-proxy.acme.com:3080/v1/webapi/saml/acs and pass her SAML assertions to Teleport.
Generate Certificate
Having successfully authenticated herself, the auth service will generate and sign a new certificate for Jane, containing information like user identity, a time-to-live, and roles. This certificate is stored locally on her client, so whenever Jane queries a Kubernetes resource she can pass the credentials without having to sign in again until the certificate expires.
Impersonate User
Having authenticated herself and provided valid credentials, the proxy can now impersonate Jane. teleport-serviceaccount will pass its own credentials as well as impersonation headers via HTTP to the Kubernetes API. In other words, the proxy will send its ServiceAccount token and include Impersonate-User: jane in the HTTP header.
The Kubernetes API will first authenticate teleport-serviceaccount and check for impersonation privileges. As we have created an impersonator role and bound it to the account, the Kubernetes RBAC layer will allow teleport-serviceaccount to impersonate user jane. The Kubernetes API will then authorize acts based on the impersonated info. In this case, jane is bound to the pod-reader role and will restrict her access to read only for all pods.
We have successfully granted permissioned access to a user authenticated via SAML!
Teleport cybersecurity blog posts and tech news
Every other week we'll send a newsletter with the latest cybersecurity news and Teleport updates.
Mapping SAML Assertions to Kubernetes Groups
You may be wondering why Teleport’s certificate authority is needed at all. This is a fair question. After all, everything we’ve done so far can be done with any ServiceAccount, why do we need another set of credentials if SAML can authenticate and authorize? While there are many reasons to employ a certificate authority, the necessary component is synchronizing RBAC across multiple different types of compute resources. In other words, when assigning an Admin role in Auth0, it should also inform the admin role across SSH, Kubernetes, databases, applications, etc. (Read more on Best Practices for Secure Infrastructure Access.) For a supported protocol like OIDC, by using the flag --oidc-groups-claim, the Kubernetes API will apply claims as a user’s groups, giving us RBAC parity between IDP and Kubernetes. But when an XML file asserts:
…
<saml2:Attribute Name="groups">
   <saml2:AttributeValue>
      admins
   </saml2:AttributeValue>
</saml2:Attribute>
…
The API will not apply SAML attributes to a known Kubernetes group because, as we know, SAML is not supported. And so, just as we required a proxy to impersonate a user, we also need that same proxy to impersonate Kubernetes groups derived from SAML attributes. This is where the second set of credentials comes in. Teleport will take a SAML attribute, map them to a Teleport role, which is then mapped to a Kubernetes group, which appears as part of the Impersonate-Group: header.
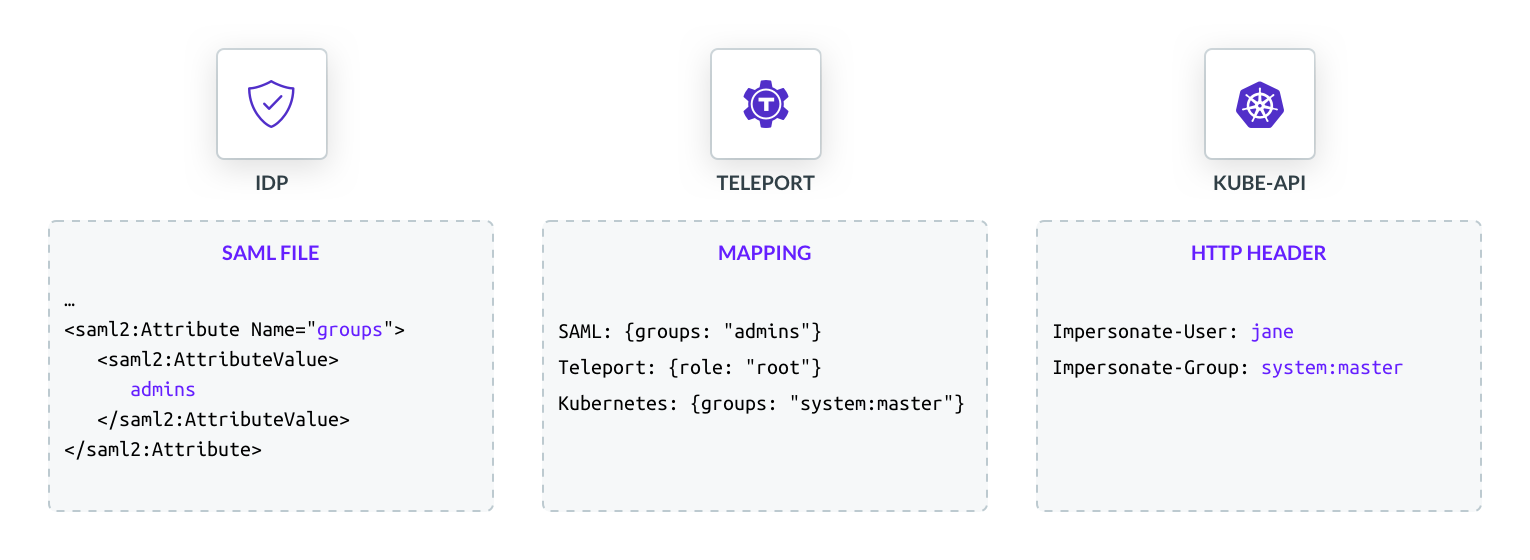
Going back to the SAML connector, we ignored attributes_to_roles: {name: "groups", value: "admins", roles: ["root"]} as part of the spec. This line allows us to map a SAML attribute to a particular Teleport role. In this case, the SAML attribute groups: admins is mapped to the Teleport root role. We also have to create a role object for root so we can complete the mapping of SAML attribute to Kubernetes group:
kind: role
version: v3
metadata:
  name: root
spec:
  allow:
    # If no user is specified, users will impersonate themselves (Jane)
    kubernetes_groups: ["system:masters"]
When Jane signs into Auth0 using SAML, she will be placed in the system:masters group automatically.
Conclusion
In this article, we’ve learned how we can SSO into a Kubernetes cluster using impersonation to extend authentication support for SAML. In short, we learned to:
- Create a proxy to stand between the user and Kubernetes API
- Set up a SAML connector to our proxy
- Give the proxy impersonation privileges by binding a ClusterRole to it
- Map SAML attributes to Kubernetes Groups
All these steps allow us to make full use of Kubernetes’ RBAC layer using information from an authentication protocol not natively supported by the Kubernetes API.
Tags
Teleport Newsletter
Stay up-to-date with the newest Teleport releases by subscribing to our monthly updates.


Subscribe to our newsletter
